My original plan for these tissue paper puff ball lanterns were decorations at Lily’s birthday party. In my mind full of ideas, her party was going to have all the frou and frou one little girl’s first birthday party could have. I was pinning decorations, cake ideas, even fun games for the kids to play. Flash forward to realizing summer birthdays are hard with friends and family on vacations and a mix up with the baptism date and so we settled on a simple at home cake and presents kind of thing. There’s always her second birthday. J I decided to use this puff ball lanterns as decorations in her room instead since I was proud of how they turned out!
I first saw a tutorial on Pinterest on how to make gorgeous fabric lanterns for a nursery. I figured I’d try to make some on a dollar store budget first for her party and if they came out cute enough I‘d consider tackling the fabric ones. I found paper lanterns and tissue paper in the colors I wanted at the dollar store and cracked open a new bottle of Modge Podge. Total cost so far--$12. I still have tissue paper out the wazoo.
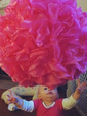
First I experimented with the size of the circles. The lanterns were not that large so I didn’t want to overwhelm them with huge tissue paper flowers. These next steps where the most tedious. While the babies napped, I cut circles out of pink, red, blue, and green tissue paper and then made each circle into a little flower. To do so, I folded each circle in half, then in half again to make a pie slice. I twisted the pointed end a few times, then opened up the “flower” part.The twisted end served as an anchor to glue onto the lantern. Once the flowers were twisted and ready to go, gluing did not take that long. I painted glue around the top of the lantern and stuck as many flowers as I could.


I looped ribbon through the handle of the lantern and with some help from Jordan hung cup hooks on Lily’s ceiling. I like the way they turned out. It kept my hands busy during nap time and downtime at night while we watched TV. And it didn’t break the bank at all! I probably spent under $20 and have some supplies left over for future projects and wrapping presents!
This would also be a good project for an older child to help out with. If you wanted the final project to be a bit more precise, they could at least help with the tedious task of folded the tissue paper.
No comments:
Post a Comment